Configuring a Cisco AnyConnect Management VPN Tunnel using Microsoft Certificate Authority (NDES/SCEP)
There is a lot of confusion out there on how this is configured, as most that have searched on this (or have attempted to configure), can attest to. It’s one of those, “oh yeah … thanks AGAIN for the clear documentation Cisco …” all jokes aside, you’ve finally came to the right place! First and foremost HERE is the link to the AnyConnect Administrator Guide (4.7). Page 126 is where you’ll find the Management VPN Tunnel information. Let’s jump in …
After successfully setting one of these tunnels up, I can tell you there are details that you have to pay attention to, I’ll mark these throughout the guide with ** IMPORTANT ** and/or ** NOTE **. Also note, this guide is fairly long, so please read it and understand it before you begin!
Compatibilities and Requirements of Management VPN Tunnel
• Requires ASA 9.0.1 (or later) and ASDM 7.10.1 (or later)
• Connects whenever the user initiated VPN tunnel is disconnected, before or after user login. The management VPN tunnel is not established when a trusted network is detected by the Trusted Network Detection (TND) feature or when an AnyConnect software update is in progress.
• Disconnects whenever the user initiates a VPN tunnel, before or after user login.
• Uses only machine store certificate authentication.
• Requires split include tunneling configuration, by default, to avoid impacting user initiated network communication (since the management VPN tunnel is meant to be transparent to the end user).
• Works with backup server list.
• Currently available only on Windows and macOS. Linux support will be added in subsequent releases.
Microsoft CA (NDES)
I won’t be touching on how to install and fully configure the Microsoft CA role, as there are already a plethora of articles out there, but I will be touching on the specific parts that have to do with configuring the AnyConnect Management VPN Tunnel.
Of course, make sure you have the Network Device Enrollment Service (NDES) installed and configured correctly. Once it is, there are a few things that must be done to allow the SCEP requests that are sent from your ASA SCEP Proxy to work.
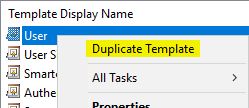
Configure a Certificate Template that will be used for the SCEP request. Jump into your Certificate Templates Console and create a Duplicate Template of User
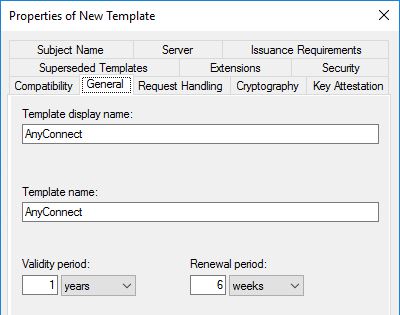
Within the Properties of New Template window, select the General tab, rename the template to something a little more identifying to the purpose. Here you can also adjust the Validity period of the issued cert, if you wish.
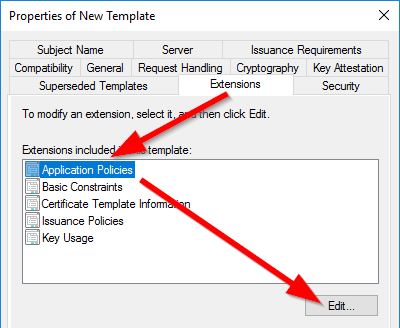
Select the Extensions tab, select Application Policies, then click the Edit button
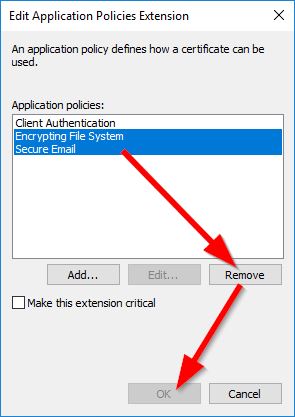
Although this step isn’t required, I like to keep things clean. Within the Edit Application Policies Extension window, remove all policies EXCEPT for Client Authentication, as it’s the only thing we need for our case
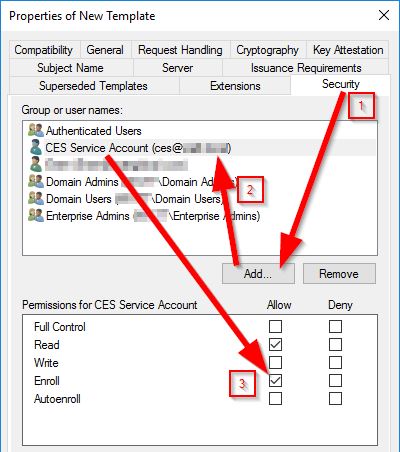
Back to the Properties of New Template window, select the Security tab and add your NDES service account. After adding, select your service account and check the Allow permission box for Enroll
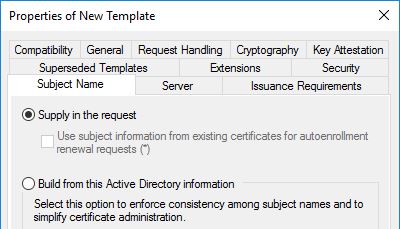
Click the Subject Name tab, then select the Supply in the request radio button
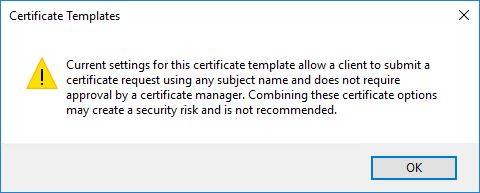
You’ll receive a warning popup, just click OK
Back to the Properties of New Template window, we’re finished here, so just click the OK button. You can close the Certificate Templates Console window.
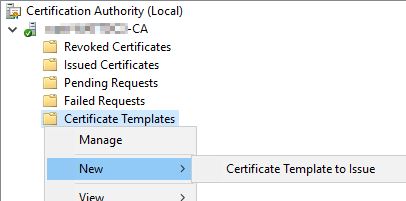
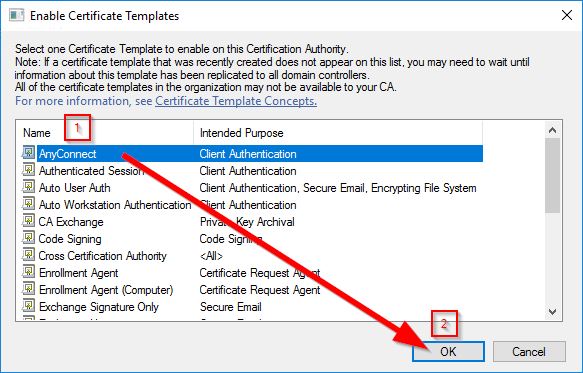
Now you’ll want to make your newly created template available to use. Moving back to your Certification Authority, Right click Certificate Templates, hover over New, then click Certificate Template to Issue
Within the Enable Certificate Templates window, select your new template and click OK
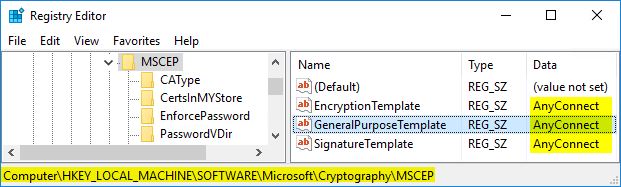
** IMPORTANT ** In order for NDES to use the proper template, and issue the certificate in the end, a couple settings must be adjusted in the Registry.
Move to HKLM\SOFTWARE\Microsoft\Cryptography\MSCEP and change the values of EncryptionTemplate, GeneralPurposeTemplate, and SignatureTemplate to the exact name of the new template you created in the previous steps. In our case, AnyConnect.
** NOTE ** The GeneralPurposeTemplate String should be the only one you have to change, but this depends on your environment. Just note, if you’re using your NDES for only the the purposes of AnyConnect, updating all of them will not present a problem
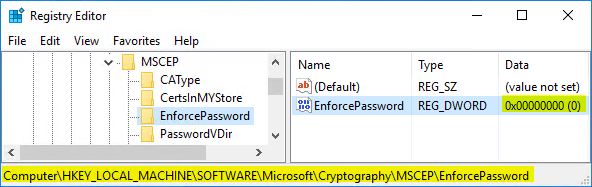
** IMPORTANT ** For our case, this next step is absolutely necessary. If you don’t do this, you will receive the Event ID 29 – The password in the certificate request cannot be verified. It may have been used already. Obtain a new password to submit with this request. when the SCEP request is forwarded from the ASA.
Move to HKLM\SOFTWARE\Microsoft\Cryptography\MSCEP\EnforcePassword and set the value for EnforcePassword to 0 (zero)
After this is completed, Reboot the server. It’s important to reboot, because there are guides out there that say restarting the certsrv Service is good enough … it’s not, REBOOT.
At this point we are finished with configuring the Microsoft CA NDES side of things.
Cisco ASA
In this guide, we’ll be building from an already implemented AnyConnect configuration. To make this seamless as possible for the users, the way we’re going to implement is by adjusting the already in place config to add the certificate enrollment. This will install the cert and allow the functioning of the Management VPN Tunnel as passively as possible to the user.
For clarification, the in place config is using a local address pool, and LDAP to Microsoft AD (with group membership mapping) as the primary means of authentication, with local fallback. Keep in mind, this config is also modeled after Cisco’s best practices
ip local pool SSLVPN_POOL 172.17.10.1-172.17.10.254 mask 255.255.255.0
!
object network obj-172.17.10.0
 subnet 172.17.10.0 255.255.255.0
 description SSL VPN Network
!
object network obj-10.0.0.0
 subnet 10.0.0.0 255.255.0.0
 description Inside Network
!
access-list SSLVPN_SPLIT standard permit 10.0.0.0 255.255.0.0
!
nat (INSIDE,OUTSIDE) source static obj-10.0.0.0 obj-10.0.0.0 destination static obj-172.17.10.0 obj-172.17.10.0 no-proxy-arp route-lookup description SSL VPN No NAT
!
ldap attribute-map MemberofLDAPGroup
  map-name  memberOf Group-Policy
  map-value memberOf "CN=VPNAccess,OU=SecurityGroups,OU=Company,DC=domain,DC=local" SSLVPN
!
aaa-server LDAP protocol ldap
aaa-server LDAP (INSIDE) host 10.0.0.1
 ldap-base-dn DC=domain,DC=local
 ldap-scope subtree
 ldap-naming-attribute sAMAccountName
 ldap-login-password password
 ldap-login-dn asaldap@domain.local
 server-type microsoft
 ldap-attribute-map MemberofLDAPGroup
!
webvpn
 enable OUTSIDE
 anyconnect image disk0:/anyconnect-win-4.7.04056-webdeploy-k9.pkg 1
 anyconnect image disk0:/anyconnect-macos-4.7.04056-webdeploy-k9.pkg 2
 anyconnect profiles Company_SSL_VPN disk0:/company_ssl_vpn.xml
 anyconnect enable
 cache
  disable
 error-recovery disable
!
group-policy SSLVPN internal
group-policy SSLVPN attributes
 dns-server value 10.0.0.2
 vpn-simultaneous-logins 3
 vpn-tunnel-protocol ssl-client
 split-tunnel-policy tunnelspecified
 split-tunnel-network-list value SSLVPN_SPLIT
 default-domain value domain.local
 address-pools value SSLVPN_POOL
 webvpn
  anyconnect modules value dart
  anyconnect profiles value Company_SSL_VPN type user
  anyconnect ask none default anyconnect
!
group-policy NOACCESS internal
group-policy NOACCESS attributes
 vpn-simultaneous-logins 0
 vpn-tunnel-protocol ssl-client
!
tunnel-group DefaultWEBVPNGroup general-attributes
 authentication-server-group LDAP LOCAL
 default-group-policy NOACCESS
!
tunnel-group DefaultWEBVPNGroup webvpn-attributes
 authentication aaa
Now we need to make adjustments to this config to allow the certificate enrollment process to happen. We’ll start by adjusting the authenticating method for our Tunnel Group, and adding certificate after the aaa. Also enabling SCEP enrollment.
tunnel-group DefaultWEBVPNGroup general-attributes
 scep-enrollment enable
tunnel-group DefaultWEBVPNGroup webvpn-attributes
 authentication aaa certificate
Now we need to add the command to allow the SCEP proxy to function. This will be the URL to your NDES server. The URL should look like
http://<NDES-IP-or-FQDN>/certsrv/mscep/mscep.dll** IMPORTANT ** This command should be added to the initial landing Group Policy. I say this, because in our example, the default Group Policy is NOACCESS, and the final Group Policy in which the user will be mapped to (because of LDAP) is SSLVPN. So in our case, the Group Policy NOACCESS is hit first before the mapping takes place
** IMPORTANT ** Cisco ASA is only able to proxy HTTP SCEP requests, you cannot use HTTPS, so make sure your NDES is not enforcing SSL.
group-policy NOACCESS attributes
 scep-forwarding-url value http://10.0.0.1/certsrv/mscep/mscep.dll
After you issue this command, it’ll reach out to the NDES and return the CA certificates. This will tell you if everything is operating correctly

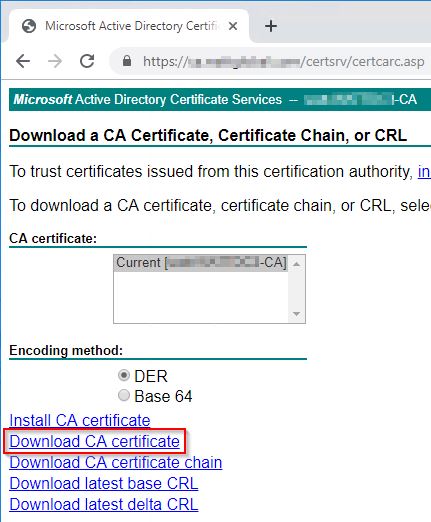
For our purposes here, the only cert we are concerned with is the root CA cert (Resident cert). This cert must be installed on the ASA within CA Certificates, so let’s go grab this cert. Open a browser and head to
https://<NDES-IP-or-FQDN>/certsrv/certcarc.aspClick on Download CA certificate
Now head to ASDM and go to Configuration > Device Management > Certificate Management > Ca Certificates then click Add
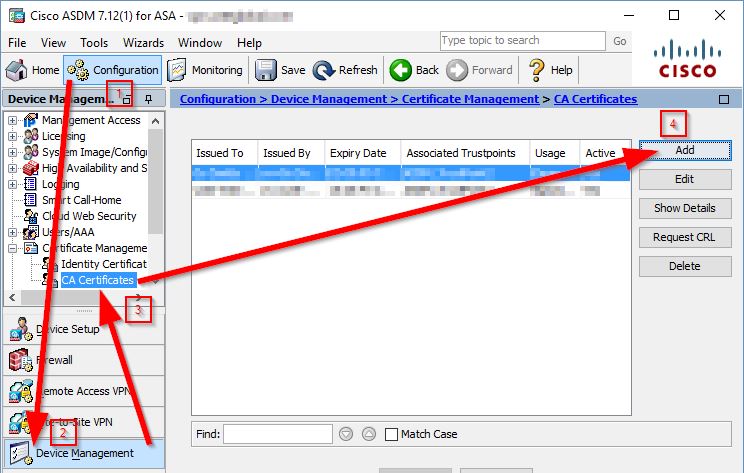
In the Install Certificate window, browse to your CA certificate, then click Install Certificate

Now that your CA certificate is installed on the ASA, let’s make some adjustments to your User VPN Profile, the one associated with your already configured client VPN. In our case it’s the one associated with the Group Policy SSLVPN.
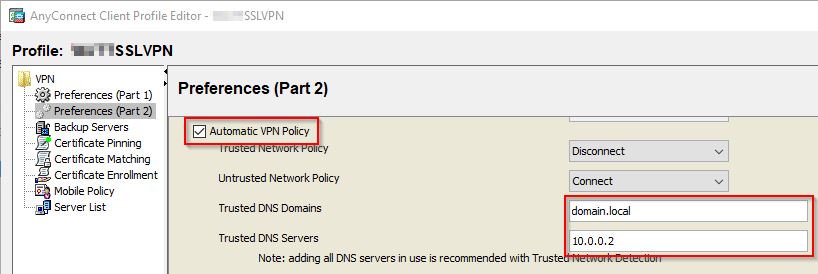
Open the Profile and click on Preferences (Part 2). Check the box for Automatic VPN Policy. Add your internal Trusted DNS Domains and Servers. If you have multiple, separate them with commas
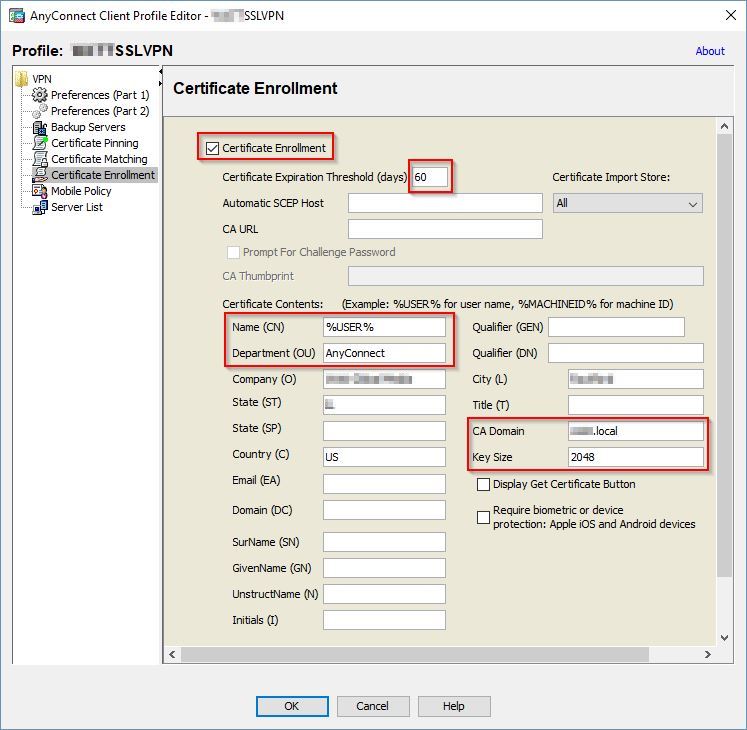
In the left pane, click on Certificate Enrollment and check the box for Certificate Enrollment in the right pane. Enter a number for the Certificate Expiration Threshold (days). Type in %USER% or %MACHINEID% in the Name (CN) box.
** NOTE ** I’m going to pause here, because I want you to know it really doesn’t matter which one you use (as far as the functionality of the Management VPN Tunnel). The only place it would matter, is when you’re looking at the already connected SSL VPN sessions (like you’re monitoring/looking at who’s connected). What you put in the Name (CN) box, is what will show as the “Username” that’s connected to the Management VPN Tunnel. For CLI, it would be show vpn-sessiondb anyconnect. For ASDM, you would go to Monitoring > VPN, then in the Filter By drop down box select AnyConnect Client.
For the Department (OU), you can enter anything you want, but be sure to keep track of this value as it’ll be used in the next step. In CA Domain, enter the local domain name in watch your CA resides. For Key Size, enter the value your NDES should be expecting. All other Certificate Contents are optional, but good to have as well
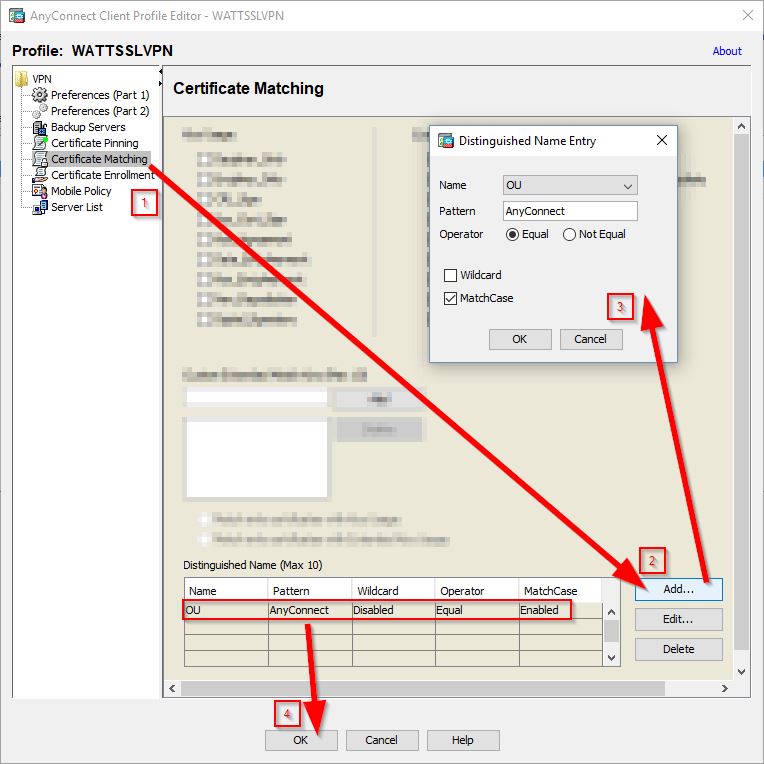
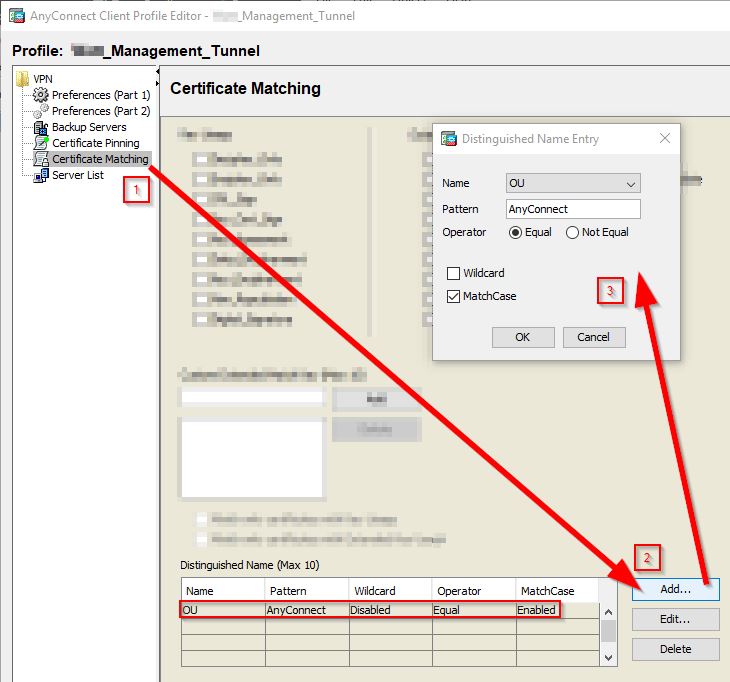
Now move to Certificate Matching in the left panel. Under Distinguished Name (Max 10), click the Add button. In the Distinguished Name Entry window, select OU in the Name drop down box. Then type in the value you entered for OU in the last step (under Certificate Enrollment), in our case it’s AnyConnect, into the Pattern box. Click OK and you’ll see the entry appear under Distinguished Name (Max 10). We’re finished with our User VPN Profile so click on OK. This process will allow the ASA to select the correct cert during authentication
To build the Management VPN Tunnel we must create the Tunnel Group and Group Policy that it will be using. They should look like the following
group-policy MANAGEMENT internal
group-policy MANAGEMENT attributes
 dns-server value 10.0.0.2
 vpn-tunnel-protocol ssl-client
 split-tunnel-policy tunnelspecified
 split-tunnel-network-list value SSLVPN_SPLIT
 default-domain value domain.local
 client-bypass-protocol enable
 address-pools value SSLVPN_POOL
!
tunnel-group MANAGMENT type remote-access
tunnel-group MANAGMENT general-attributes
 default-group-policy MANAGEMENT
tunnel-group MANAGMENT webvpn-attributes
 authentication certificate
 group-alias management enable
 group-url https://vpn.domain.com/management enable
** IMPORTANT ** Notice that the Client Bypass Protocol is enabled in the Group Policy. This must be enabled if you do not have BOTH address pools, IPv4 and IPv6, configured to hand out IP addresses. Meaning, if you only have one (like in our case, only IPv4 … or maybe in someone else’s case, only IPv6), then the Client Bypass Protocol must be enabled. If it’s not, and the everything else is configured correctly, you’ll see the Management Connection State show as “Disconnected (invalid VPN configuration)“.
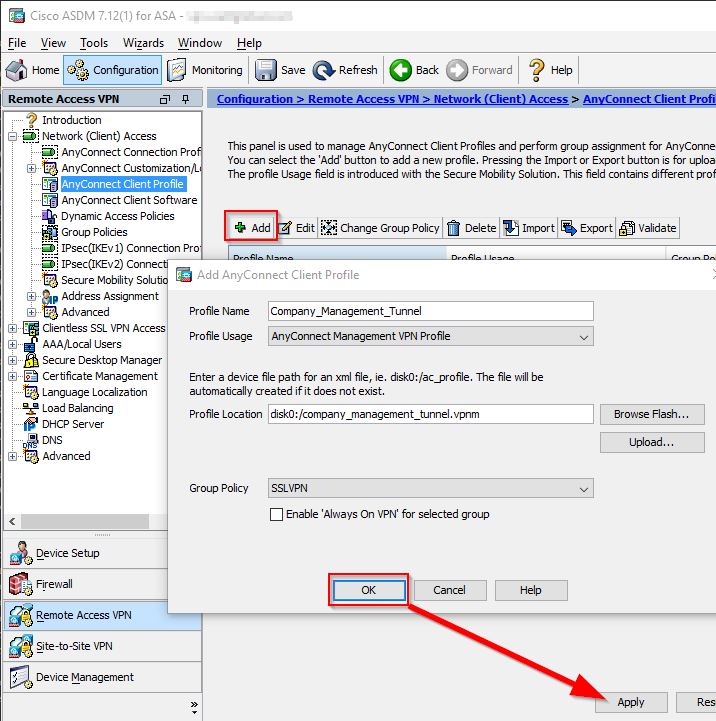
Now let’s build the Management VPN Tunnel Profile. In ASDM, under Remote Access VPN > Network (Client) Access > AnyConnect Client Profile click the Add button. Enter a Profile Name then in the Profile Usage drop down box, select AnyConnect Management VPN Profile.
** NOTE ** Management VPN Tunnel Profile files should have the file extension .vpnm, which differs from the normal User VPN Profile of .xml
In the Group Policy drop down, select your User VPN Group Policy, in our case it’s SSLVPN.
** IMPORTANT ** Make sure you select the Group Policy that your normal User VPN is associated with so that when the user connects, it also downloads the Management VPN Tunnel Profile to the users PC. This is ultimately how the Management VPN Tunnel is enabled and used on the users PC. It is possible to deploy it “Out of Band”, but that will be another discussion.
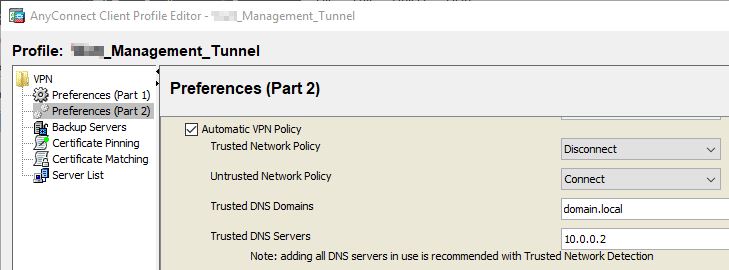
Now let’s Edit our newly created Management VPN Profile. Go to Preferences (Part 2) and check the box for Automatic VPN Policy. Add your internal Trusted DNS Domains and Servers, just as we did for our User VPN Profile.
** NOTE ** Page 127 on the AnyConnect Administrator Guide 4.7, under Incompatibilities and Limitations of Management VPN Tunnel, it states …
“The management VPN profile settings are only enforced by AnyConnect while the management VPN tunnel is active. When the management VPN tunnel is disconnected, only user VPN tunnel profile settings are enforced. Therefore, the management VPN tunnel is initiated according to the Trusted Network Detection (TND) settings in the user VPN tunnel profile, namely when TND is disabled or when it detects “untrusted network”, regardless of the configured Untrusted Network Policy. Additionally, the TND Connect action in the management VPN profile (enforced only when the management VPN tunnel is active), always applies to the user VPN tunnel, to ensure that the management VPN tunnel is transparent to the end user. For a consistent user experience, we recommend that you use identical TND settings in both user and management VPN tunnel profiles.“
This is why we configure an Automatic VPN Policy under both Profiles
Now go to Certificate Matching and repeat the same steps we did there for the User VPN Profile
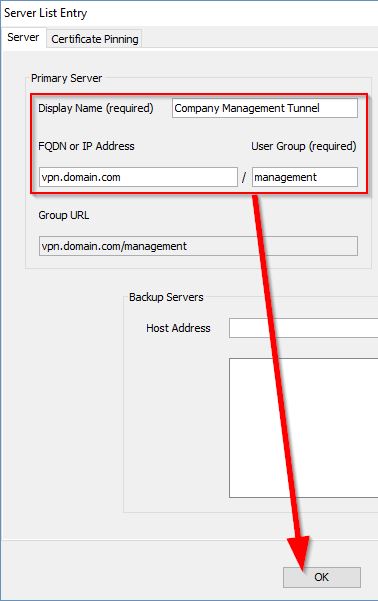
In the last step for our Management VPN Tunnel Profile, go to Server List. Click on Add. Within the Server List Entry window, enter a value for Display Name (this is not actually used anywhere, I’m not sure why they “require” it … I’ll leave it up to you what you really want to put here 🙂 ). Now in FQDN or IP Address, enter the same value here as you have under your User VPN Profile. In the User Group box, enter the Management VPN Tunnel Alias (this was configured under the Management Tunnel Group), in our case it’s management. Click OK
Click OK to close the Profile window, then back in ASDM, click the Apply button to send the config and new Profile file to the ASA.
At this point, we are fully configured and ready for testing. Go ahead and connect to your user VPN tunnel and enter your credentials as normal. After entering them, AnyConnect will proceed with the connection, but then reach out to your NDES for certificate enrollment. After a few moments you should see a popup window
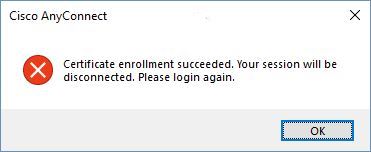
This means the Enrollment was successful and the certificate was installed on your PC, you can click OK. At this point, just cancel logging back into the User VPN, and click the Gear icon in the lower left of AnyConnect to open the AnyConnect Information window. Go to the Statistics tab and under Connection Information you should now see Management Connection State: Connected (vpn.domain.com)
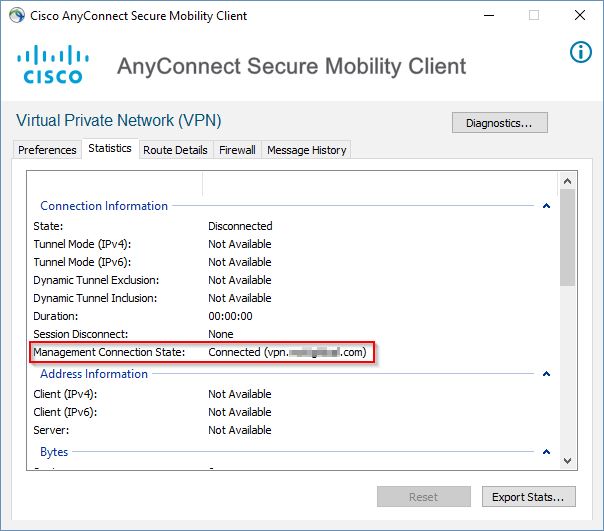
If you connect back to a User VPN Tunnel, the Management VPN Tunnel will disconnect and show Disconnected (user tunnel active)

Congratulations, you now have a fully functional AnyConnect Management VPN Tunnel!!

Awesome write-up, thank you!
LikeLiked by 1 person